Getting started
This chapter brings us closer to the end of the course. Now it's time to get down to the nitty-gritty of programming, albeit with a pseudo-language and relatively short exercises. The 20 exercises on offer will enable you to put yourself in the environment of a real programmer, while also being able to observe what's going on inside the machine.
ObjectivesUse all the knowledge acquired in previous chapters to create real programs (even small ones).
Acquire a certain "gymnastics" of the mind to find the necessary resources to face sometimes unexpected situations.
PresentationWith an interface similar to that of robots, you'll be in control of a real computer's dashboard. Not only will you be able to create the codes for the 20 statements we've provided to get you started gradually, but you'll also be able to create your own statements or take some from computer books and test them on this platform.
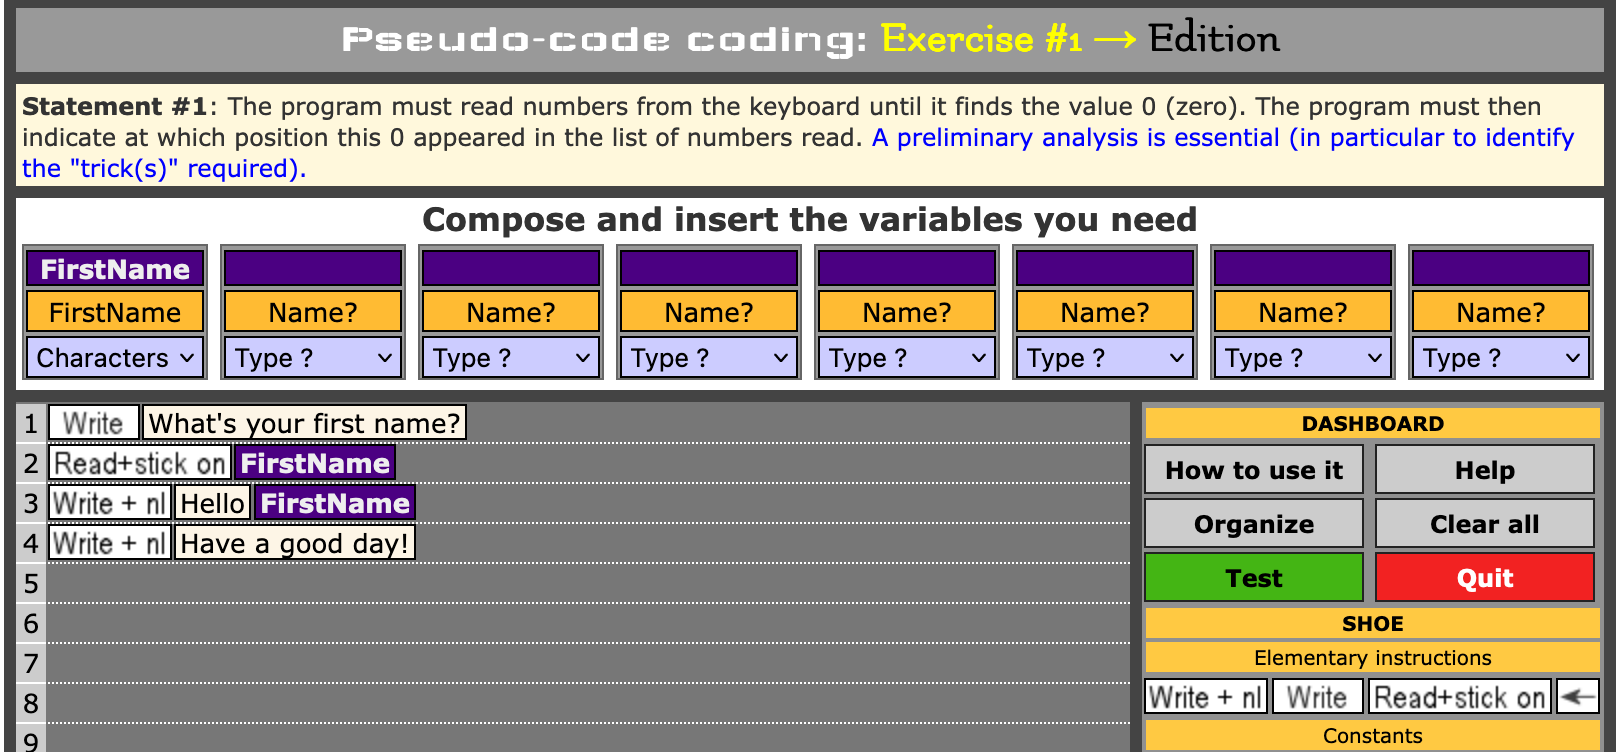
Exemple of statement. Note: the examples developed below are NOT the resolution of this exercise.

What's more, you'll be able to witness every phase of your program's execution... the "black box" becomes transparent, showing you all the machine's activities, enabling you to form "mental images" that will come in very handy later on. It will also make it easier for you to correct any errors.
Edition phase
Here's what the Edition phase looks like, and what each of its components does.
First of all, you have 8 variables, memory cells symbolized by the famous "slates" in the "Tricks" chapter. For the sake of simplicity, the 5 data types seen in the previous chapter have been reduced to 3:
- Integers and reals have been grouped together in the Numbers type;
- Characters and strings have been grouped together in the Character type;
- and finally, Booleans remain a type in their own right: the Booleans type.
The table of variables looks like this:

We'll take a closer look at how to use it below.
Next come all the commands. You need to be able to display "things" on the screen, read "things" from the keyboard, fill variables, read them, perform calculations, make comparisons, test conditions... All this is made possible by the following control panel:
Before we move on to some programming examples, let's take a look at what these commands are for and how to use them:
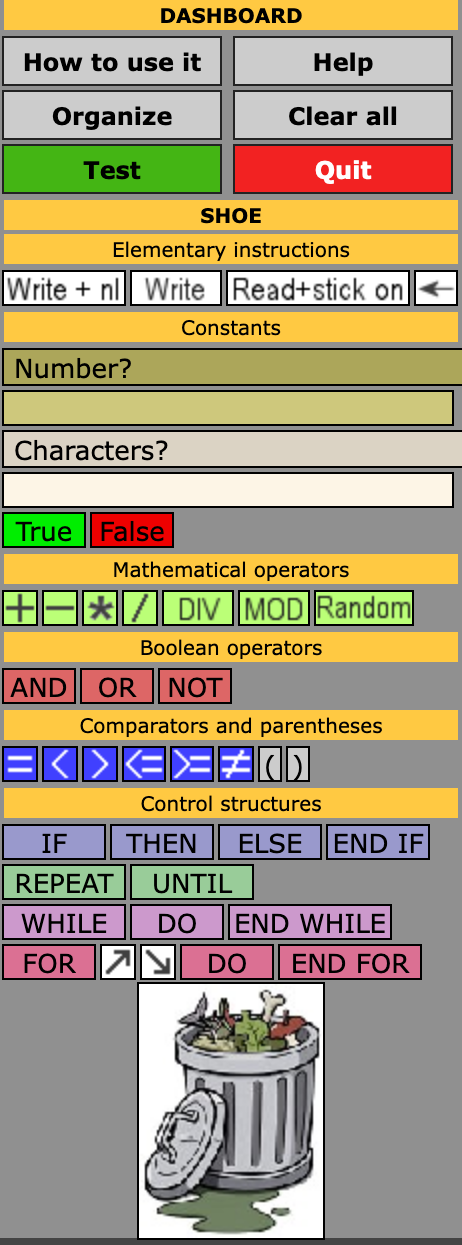
Dashboard
|
|
Displays the user manual as it appears later in this page. |
|
|
Displays the reasoning behind your program. This will soon be a video. |
|
|
Allows you to set up an automatic layout for your magnetic table. This will highlight the contents of the control structures by indenting the text in relation to the margin. |
|
|
Allows you to erase the entire contents of the magnetic board and start your program from scratch. Please note that deletion is irreversible and cannot be reversed. |
|
|
Enables you to enter the execution phase to test your program. |
|
|
Allows you to exit the exercise and return to the menu... Please note that your entire program is deleted when you do this, and can no longer be recovered. If you want to keep a "souvenir" for your archives, you can make a screen copy before quitting. |

|
The garbage can allows you to remove elements from your magnetic board. Note that the item must be completely outside the magnetic board to disappear. Elements to be removed can even be placed on the right outside the program window. All elements placed in or to the right of the garbage can will disappear with the next layout. |
Variables

|
You have 8 variables at your disposal. To use a variable, you need to give it a name (in the orange rectangle in the middle) and a type (by pulling down the menu in the bottom frame). You have 3 possible types: "Numbers" (integers or reals), "Characters" (whatever you like) and "Booleans" (represented by the two concepts True or False). When you leave the orange rectangle, the variable name is automatically copied to the dark blue rectangle above. You can then drag this rectangle onto the magnetic board to use this variable in your program. |
Basic action instructions
|
|
Allows you to display the data that follows on the screen and then move on to the line on the screen. Note: it is not possible to perform calculations or comparisons in a display. |
|
|
Displays the data that follows on the screen, without switching to the line on the screen. Note: it is not possible to perform calculations or comparisons in a display. |
|
|
Enables you to read data from the keyboard and place it, or "assign" the variable named after this instruction. |
|
|
Allows you to assign the variable cited before this instruction with data from another variable, or from one or more calculations or comparisons. |
Constants

|
There are times when you need to be able to introduce "constants" into your code, i.e. fixed numbers or strings, or the concepts True or False.
You can do this by entering data into the rectangles marked "Numbers?" or "Characters?", but note that the top frame is reserved exclusively for Numbers and the one below is for strings.
How it works: type your data into the appropriate Number or Characters box. When you leave this frame (by clicking in the frame just below, for example), the data will be automatically recopied into the frame below what you've just written. You can then drag this frame to the desired place in your procedure or code. The two Boolean concepts are also available for dragging within the program to the desired locations. |
Mathematical operators
|
|
Basic operators to perform the corresponding operations. To function, each of these operators must be surrounded on both sides by "Number" type data. If you want to negate a mathematical expression, you'll need to place a 0 in front of the -. Operations will take into account parenthesis levels and operator priorities. |
|
|
Allows you to obtain the integer division of the preceding data by the following data. For example, 14 DIV 4 gives 3 (4 only goes into 14 3 times). |
|
|
Returns the remainder of the integer division. For example, 13 MOD 4 will give 1, as 1 is the remainder of the integer division of 13 by 4. |
|
|
Obtain a random number between 0 and the number mentioned after Random, these two numbers being included. It's up to you to perform the appropriate mathematical operations to obtain the random number within the limits that suit you. For example, to obtain a random number between 10 and 18, enter (Random 8)+10. |
Boolean operators
|
|
These two operators must be surrounded on both sides by "Boolean" data, taking into account any parentheses.
AND will give "True" if both operands are True. OR will give "True" if at least one of its two operands is True. |
|
|
NOT must be followed by a "Boolean" data type, taking into account any parentheses.
NOT will invert the state of the operand that follows it, changing it from "True" to "False" or vice versa. |
Comparison operators and parentheses
|
|
Used to compare two identical types of data. The data must be on either side of the operator, taking into account any parentheses, and the result will be of "Boolean" type (True or False).
From left to right, the signs correspond to: equal, smaller, larger, smaller or equal, larger or equal, different. Parentheses are used to change the priorities of mathematical and comparative operations. |
Control structures

|
These control structures are well known, having been used since the very first exercises.
The FOR structure is an exception, however, and deserves a few explanations. |
A FOR loop is a repeating loop with a built-in counter. The counter is incremented ![]() or decremented
or decremented ![]() by one for each turn of the loop, depending on the sign chosen.
by one for each turn of the loop, depending on the sign chosen.
The FOR loop consists of the following 6 elements, in the correct order and on the same line:
- The element
 signalling entry into a FOR control structure;
 - The loop variable that will count the number of turns, necessarily of type Number;
- The numerical value or numerical variable signalling the value that the counting variable will take when the FOR loop starts;
- The numerical value or numerical variable indicating the value up to which the counting variable will evolve;
- The sign of evolution of the counting variable, which will be either incrementing
 or decrementing
  ;
; - The
 .
.
The ![]() will signal the end of the instructions in the FOR loop.
will signal the end of the instructions in the FOR loop.
Here are a few examples of FOR loops that have been set up correctly, provided the values are numerical and each variable already contains a numerical value.

Some examples in pseudo-code:
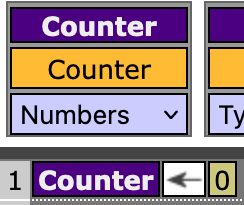
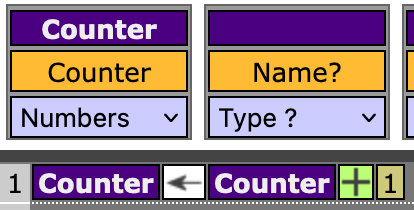
A. Declare the "Counter" variable and initialize it to 0 (zero). The following steps are required:
- Declare the Counter variable by typing this word in the orange box marked "Name?" of a free variable;
- Press the "Tab" key, which selects the window below (with the drop-down menu). That copies the variable name into the purple frame;
- Pull down the menu and select "Numbers?" or press the "Down Arrow" key once;
- Drag the purple frame onto a free line of the magnetic frame;
- Drag the
 from "Elementary instructions" sign onto the same line behind the purple frame;
 - In the "Constants" frame marked "Number?" type the value 0 on the keyboard and press the tab key;
- Drag the frame containing the 0 behind the sign...
...and you're done. You can now perform a ![]() to put everything in order.
to put everything in order.
You should have the following piece of code:
Click on ![]() to test your program.
to test your program.
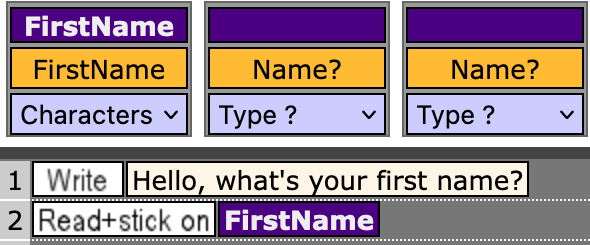
B. Ask the user for his first name and store it in the "FirstName" variable. Perform the following steps:
- Drag
 block of the "Elementary instructions" onto a free line of the magnetic frame;
 - In the frame marked "Characters?" type the text "Hello, what's your first name?" on the keyboard and press the tab key;
- Drag the frame containing this sentence behind you've just placed;
- Drag
 block of the "Elementary instructions" to a free line below the previous one;
 - Declare the FirstName variable by typing this word in the orange box marked "Name?" in a free variable;
- Press the "Tab" key, which selects the window below (with the drop-down menu). That copies the variable name into the purple frame;
- Pull down the menu and select "Characters?" or press the "Down Arrow" key twice;
- Drag the purple frame FirstName behind the block you've just placed...
...and you're done. You can now perform a ![]() to put everything in order.
to put everything in order.
You should have obtained the following piece of code:
Click on ![]() to test your program.
to test your program.
C. Increment (add 1 to) the "Counter" variable. Perform the following steps (bearing in mind that, normally, the Counter variable is already declared):
- Drag the purple frame of the Counter variable to the beginning of an empty line in the magnetic array;
- Drag the from "Elementary instructions" sign onto the same line behind the purple frame;
- Drag the purple frame of the Counter variable behind this sign again;
- Draw the
 sign for "Mathematical operators" on the same line behind the purple frame;
 - In the frame marked "Number?" type the value 1 on the keyboard and press the tab key;
- Drag the frame in which this value has been entered behind the sign...
...and you're done. You can now perform a ![]() to put everything in order.
to put everything in order.
You should have obtained the following piece of code:
Will this program work?
No, it won't. When it runs, an error will be signalled because the line of code asks for the Counter variable to be read when there is no value in it yet.
How can you correct this? (See point A above.)
D. End a "Repeat" loop by checking whether the content of the "Number" variable is a multiple of 5. To do this, you need the following line of code:
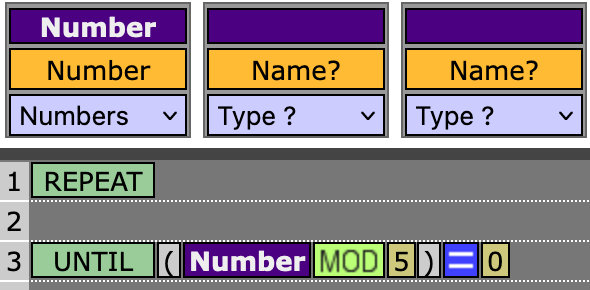
This program won't work because it's incomplete. What do you need to add to this program to make the loop work and stop at a certain point?
Execution phase
When you ask to ![]() the program, you enter the Execution phase. A new dashboard appears with various frames and buttons. From top to bottom...
the program, you enter the Execution phase. A new dashboard appears with various frames and buttons. From top to bottom...

Statement
A reminder of the statement is displayed to check whether the program has been executed according to the specifications. Note: the contents of the examples shown have nothing to do with the statement displayed.
Variables

- The first line (purple frame) contains the variable name;
- The second line contains the variable's declared type;
- The third line contains the contents of the variable. To make it easier to distinguish between the three types, numbers have a khaki background, strings have a beige background and Booleans have a background made of green and red, symbolizing the two concepts True and False.
Workspace
The computer will process the lines of code one after the other. It's as if the computer took each line of code and brought it into a workspace to execute its contents. This is symbolized by the workspace between the variables and the magnetic array.

This workspace is very interesting for your learning. If you carefully observe the line displayed in the workspace and its consequences, you'll gain a better understanding of how the computer works.
For example, in the image above, line 3 has just been processed. You can see that the request is to display "Hello" FirstName. If you look at the screen, where the display took place, you'll see, as shown by the orange frame, that the computer displayed "Hello John". In the workspace, the computer has therefore replaced the variable name with its content before displaying it.
Screen, keyboard and dashboard
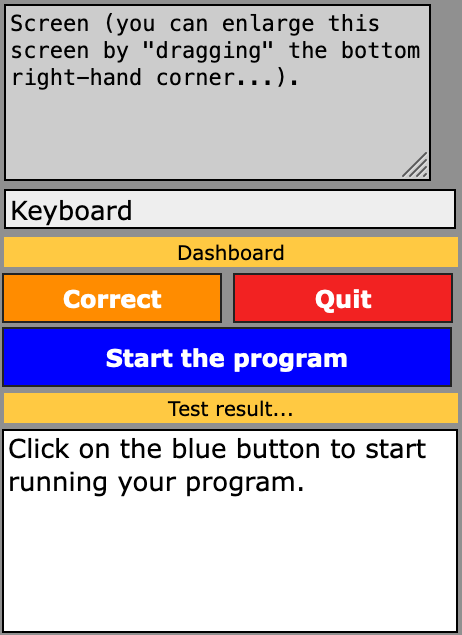

|
Simulates the computer screen: every time you ask to Write "something", this is where it will appear. This screen can be enlarged if there are many displays. |
|
|
Simulates the keyboard: when the program Read+stick on data from the user, this is where you can type it on the keyboard and validate it with the "Enter" key. |
|
|
Allows you to return to the Editing phase of your program so that you can modify it. |
|
|
Allows you to exit the exercise and return to the menu... Please note that your entire program is deleted when you do this, and can no longer be recovered. If you want to keep a "souvenir" for your archives, you can make a screen copy before quitting. |
|
|
Starts the execution of your program. |

|
This button appears when you have asked for your program to be started (blue button above). This button lets you run the program step by step and see, at each line, the effect of that line on the computer's operation. |
|
|
When the start button turns green, your program has been completely executed without a fatal error. In the event of a fatal error, the button turns red. |

|
This text is displayed if your program was completed without fatal errors. However, this does not mean that your program meets the specifications of the statement. The person in charge of your training needs to check it. |

|
This window will display all the results for the line in the workspace: test results, counting loop evolution... Always take a look before clicking on the "Next step" button. |
As with robots, the best exercise is to predict what's going to happen next. If you can do this without making any mistakes, you're well on the way to becoming an excellent coder.
Good luck and all the best.
Please note: if you notice any technical problems in the execution of the programs, please let us know at info@fadagogo.com. We'll do our utmost to solve the problem as quickly as possible. Please tell us as much as possible about the circumstances of the problem, if possible with a screen copy.